Quantcast
Channel: Rohos Disk – Rohos
Viewing all 45 articles
Browse latest View live

Using an electronic key for accessing Rohos Disk.

$
0
0

Configuring a key device for disk decryptionFor greater security and convenience, instead of a password you can use an electronic USB key to decrypt and open a disk. As a key, you can use a USB Flash storage device, a token, or a smart card. A full list of suitable devices can be found here.

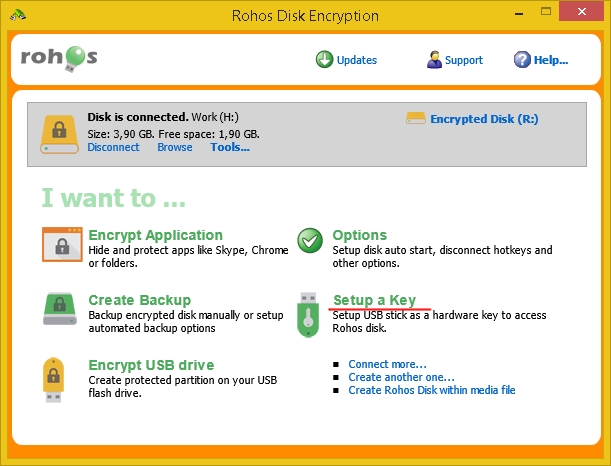
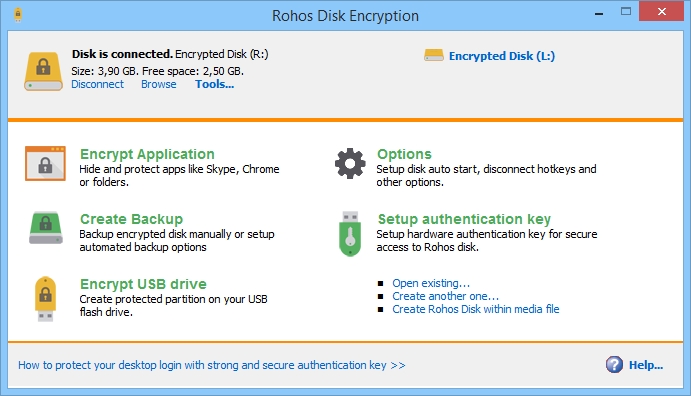
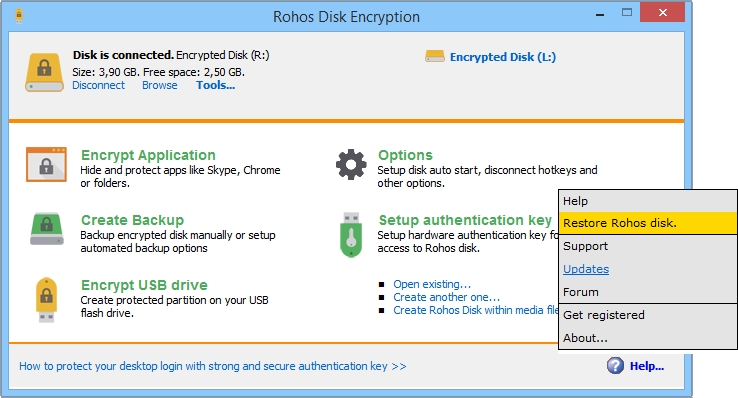
You can create a key using the setup wizard immediately after installation, or by using the Setup a Key command in the main program window (see the illustration).

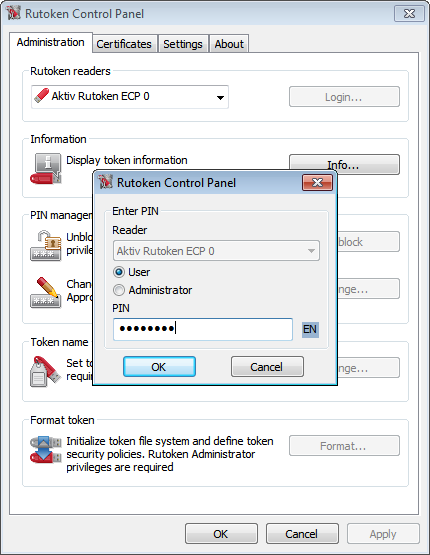
The disk password is stored on the key in an encrypted format. When using several tokens, you should set and memorize a PIN code. All devices, with the exception of USB Flash storage devices, require that you install the manufacturer’s drivers. Some tokens or smart cards require that you initialize them first using the manufacturer’s utility. At our blog you will find an overview of the most popular tools for protecting your information.

Naturally, for decrypting a disk placed on a USB storage device, you cannot use the same USB storage device as an access key.

Open the program options. Here you can set automatic activation of the encrypted disk when a key is connected, as well as automatic deactivation of the disk when the key device is removed.

TIPS FOR USING AN ELECTRONIC KEY FOR PROTECTING YOUR INFORMATION

Over time, electronic keys have proven themselves as a useful and vital solution. They are strong and reliable tools for information security. Below we offer some tips that we feel are especially important:

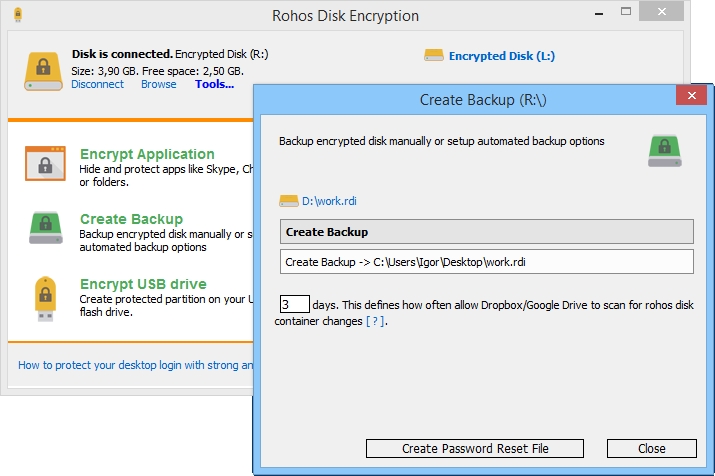
  • Keeping a spare copy of a key will make it much easier and faster to access your information in the event that the first key is lost or damaged. If you have decided to use electronic keys, then buy two of them, configure them both, and keep the second as a backup.
  • If you do not wish to create a second copy of the key, then it is advised that you make a backup copy of the certificates and other key information located on the electronic key. This is also the best practice. Such backup copies must be kept in a secure place.
  • If you own a laptop computer, then you should use a micro version of the key device. These do not greatly protrude from the laptop body and are not as susceptible to damage. Read our overview of ruToken micro keys.
  • It is important to note that you do not have to worry about leaving the token connected to the laptop or desktop computer when you are away from it. Thanks to the PIN functionality, the electronic key is protected against use by a third party. No one can use the key without the PIN code, and in the event that the wrong PIN code is entered three times, the key is automatically blocked. A key can be unblocked using the Administrator PIN.
  • By default, the Administrator PIN is set on all tokens and its value is shown in the documentation. Therefore, you must change it immediately to a new value. Changing the Administrator PIN can only be done using the token service utility provided by the manufacturer. Again, we recommend storing the new Administrator PIN in a safe place.

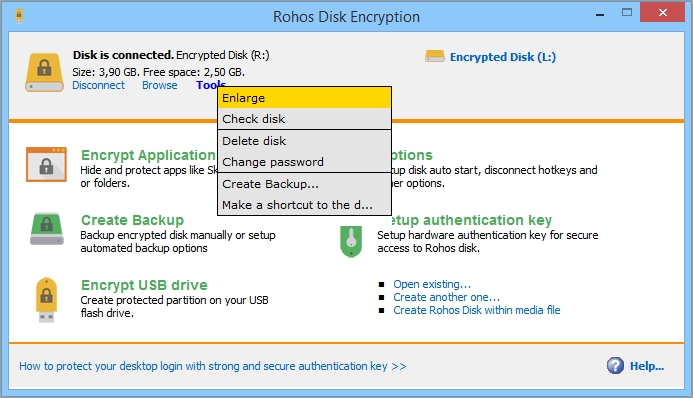
In Rohos Disk, there is a convenient function for disabling access to a Rohos disk when you are away from it. When you return, the Rohos program will ask for the token’s PIN code. The user will have 25 seconds to supply this information before the disk is automatically disabled for security reasons.

Screenshots:

Configuring a key device for disk decryption

key_setup_for_RD_en2

key_setup_for_RD_en3key_setup_for_RD_en4


Setting up shared access to an encrypted disk

$
0
0

Rohos Disk Encryption allows you to set up shared access to an encrypted disk for different uses:

  1. Shared access for all users on a single computer. For example, on Windows Terminal Services,
    In this case, users do not need to know the password for the disk, and they do not need to launch Rohos Disk. They do not know where the disk’s file container is located, and they cannot delete it. Entering the password for accessing the disk is the responsibility of the Administrator or Rohos disk owner.
  2. Access for select users working with a single Windows computer.
    In this case, each user will know the password for the disk. Each user will enter the password for accessing the disk independently of the others whenever necessary.
  3. Shared access using a shared folder on the network.
    In this case, the Rohos disk drive letter open for shared access on the local network will be a file server. Entering the password for activating the Rohos disk will be done once each day by the Administrator or Rohos disk owner. The Administrator or owner will also assign network access rights to users and will be responsible for making backups and shutting down access to the disk.


Shared access for all users on a single computer

1stcase1

In the Rohos Disk options, you must enable the option Enable shared disk drive (local and network).

options

After this is done, when the Rohos disk is activated by one user, the drive letter for this disk will immediately become visible to all users when they open Explorer.

drive_letter

By enabling the option read-only, all users – including the disk owner – will not be able to make any changes to the contents of the Rohos disk.

read-only

You can set different rights to read or write to individual folders within the disk itself. Some users will have full control, while other users will have read-only access, and still others will be prevented from viewing the contents of the secret Rohos disk.

NTFS

Advantages of this method:

  1. The password for the disk is kept by one user, the disk owner.
  2. There is a possibility of restricting access to certain users.
  3. The disk itself can be located somewhere accessible only to its owner, which reduces the risk of it being copied or deleted by a third party.
  4. Users do not need to know the password to the secret disk, as the drive letter for the connected disk will be readily visible in Windows Explorer.
  5. This solution is also suitable for Terminal Server. A work folder with especially important and confidential files and applications can be converted to a Rohos disk by using “Encrypt folder”. This will make data protection transparent for all Remote Desktop users.

Features of this method:

When other users open Rohos Disk, the drive letter will be visible among the other disks. If one user accidentally deactivates the disk, it will be deactivated for all users. To stop this from happening, you can prevent ordinary users from launching Rohos Disk on the server by protecting it with a password.

Pass

In addition, you need to untick the box Show Rohos Icon near the clock so that users are not able to manage the disk using the icon next to the clock.

Providing access to certain users working with a single Windows computer

shared_container1

To set up this method of shared access:
1. You must turn on the option Enable shared Disk drive. In this case, the disk’s drive letter will be visible only to the session or account which supplied the password for activating this encrypted disk.

1

2. The file container must be placed on a shared-access folder and different access rights should be assigned to it for different users in order to prevent this file from being copied or deleted without authorization. Some users can thus open the file for reading and writing, while other users will only be able to read from the file. Still other users will not be able to see it at all.

shared

3. It is necessary to create a shortcut to activate this disk and to copy it onto the Desktop for selected users.
To do this, in the main window choose Rohos Disk Encryption > Disk > Tools > Create disk shortcut. Then, you will find the shortcut on your desktop.

4. Provide the Rohos disk password to all users or create access key devices for them such as SafeNet Ikey, ruToken, eToken or other PKCS#11-compatible solutions.

Advantages of this method:

  1. The disk owner doesn’t have to active the Rohos disk every time.
  2. There is no need to protect the Rohos Disk management console with a password.
  3. If one user closes the disk, this will not disturb the work of other users.
  4. The disk’s drive letter is not shown in other sessions. For example, this is useful when the system does not have trustworthy administrators, and they will not be able to gain access to the secret disk. In the event that a key device is used to access the disk, it will not be possible for others to intercept the password.


Shared access using a shared folder on the network


The entire Rohos encrypted disk or particular folders on it can be opened for shared access in the network. Choose the disk in My Computer and enter its settings by using the context menu.

shared_disk9

Limiting access to this disk for different categories of network users can be done here by using the Permissions command.

Now connect the Rohos disk network folder for the workstations on the network:

shared_disk10

Advantages of this method for providing access:

  • The encrypted disk can be located on the computer as well as on a connected USB storage device.
  • You can set things up so that when a USB storage device is disconnected, the encrypted disk will be automatically disabled, the network folder will disappear, and access to it will immediately be stopped.
  • You can configure a hardware security module (HSM) for accessing a secret disk, using for example a USB token such as ruToken, iKey, or eToken. You can then entrust the key token to a responsible employee for enabling the disk. When the token is removed from the PC, the disk will be automatically disabled as well.
  • You can activate the secret disk when necessary by entering a password or automatically when connecting a USB key token.
  • The network does not necessarily need to know the password for the disk in order to begin working with it, and all data will be reliably protected on the file server.

While one network user is working with one file or directory, another user can work with a different file or directory. One perceives the disk as a simple shared-access resource. However, you just need to log out of the system and access to the disk will be automatically stopped.

Protecting your computer and data with ruToken

$
0
0

Authenticating for Windows and accessing a secret disk with a ruToken key.

User authentication and identification on Windows with USB keys.In short: now the popular ruToken identification device can be used in Rohos Logon Key and Rohos Disk as the one key needed to log in to Windows and your protected data. Rohos Logon Key works fully on Windows Vista/7 and also supports authorization for remote desktops using a ruToken. User authentication and identification with USB keys.

The ruToken device has been developed by the Russian company Aktiv, which produces a family of identification devices for user device-based authorization when accessing IT resources and protected electronic data.

Logging into Windows with ruToken.

Rohos Logon Key provides reliable two-factor authentication where a user can access Windows just by holding a USB token and knowing a PIN code. The only thing the user has to do is connect the ruToken to the USB port and enter the PIN code. Rohos Logon Key is the only program that works fully on Windows Vista/7 and also supports authentication for remote desktops using a ruToken.

Advantages of using a ruToken with Rohos Logon:

  • password is automatically changed on the Administrator’s request,
  • works in Windows Active Directory,
  • supports UAC — receive a administrator password with a ruToken in the authority request dialog.

rohosvistacredential

Learn more: Rohos Credential Provider.

  • Emergency login – this helps you log into Windows when you have lost or damaged your ruToken. Default PIN – if you set the PIN code to 1111, then the Rohos Logon Key will not ask the user for the PIN.
  • Ability to use several ruToken devices for logging in to one computer, and vice versa, one device for several computers.

Rohos Logon Key takes up 4 kilobytes of space on a ruToken and does not conflict with other software using the ruToken.

Using ruToken and Rohos Logon Key on the network

Rohos Logon Key supports working with a Windows Active Directory network. The Rohos Management Tools package allows you to easily install the program and an eToken USB key on a large number of computers remotely.

Rohos Management Tools version includes two utilities:

  • USB Key Manager – this is used to configure all tokens for authentication on network workstations (creation/deletion of profiles on the token, creation of a backup copy, setting the PIN code, configuring eToken on remote desktops).
  • Rohos Remote Admin — this utility allows you to change Rohos Logon Key settings on a remote computer connected to Active Directory. It allows you to change the following settings: permissions for logging in only with an eToken, action after removing the token, blocking tokens for users, etc.

When configuring a key in the USB Key Manager program, the Domain field should be left empty, then export the list of keys onto the target computers.

MSI package for program installation. Learn more.

Setting up a ruToken in Rohos Logon Key:

To start, it is necessary to download and install the ruToken drivers from the manufacturer’s website. Restart the computer so that the new drivers begin working. Launch the ruToken Control panel. Enter a new PIN code for the device. After this, the new PIN will be requested each time the token is called on.

In the Rohos Logon Key main window, open the Options window.

In this window, you should select PKCS#11 security module as the type of device to be used as a login key (a default setting for this option can be created in the MSI package setup). In this window you can set various options for the USB key. You can find details in the notes. To set up an ruToken for logging in to the system, you must do this in the Configure Key window

You configure a ruToken directly on the computer to which you want to provide local or remote access, as well as over a Remote Desktop connection that provides the remote computer with access to the ports of the local computer.

Rohos Disk — protect your data with a ruToken USB key:

A ruToken USB token can also be used as an access key for a secret disk in the Rohos Disk program. Rohos Disk offers a convenient solution for protecting your data. The secret disk works autonomously: when you log in to the system using a ruToken USB key, the disk will become available. When you remove the USB key, the disk will not longer be available. The built-in file shredder helps you move files and folders onto the Rohos Disk and then wipe the originals. The shortcuts to documents on the desktop will be automatically hidden on the Rohos disk at the end. An icon for the disk is available in MS Office and other applications for quick access. Rohos Disk can be installed on a portable USB flash storage device for working with a secret disk on the go directly from the USB flash drive.

Setting up eToken for accessing a secret disc

Note: to use eToken in Rohos Disk, you must install Rohos Logon Key, as the basic configuration of the eToken for logging in to the system is done in it.

Specifications:

For Rohos Logon Key to work with a ruToken you need:

  • Windows 2000 / 2003 / XP / Vista / 7 / 8 / 2008
  • 2 MB of free space available on the disk
  • Administrator rights to install programs
  • The ruToken driver installed (with the PKCS11 module rtpkcs11.dll)

Rohos Logon Key supports any PKCS11-compatible token:

  •  Aladdin eToken PRO/R2
  • Aktiv ruToken
  • uaToken
  • iKey 1000/2000
  • Crypto Identity
  • ePass


Backup copies made faster in Rohos Disk Encryption 2.2

$
0
0

Rohos Disk ensures that your data is protected from third parties by locking the disk in your absence. The size of the disk can be increased as needed. You can create several disks on a PC, USB flash drive, or a DVD at the same time.

We’ve introduced a new version of Rohos Disk — Rohos Disk Encryption 2.2. A distinctive new feature that it brings is the remarkable Backup Disk functionality. Now making a backup copy of the contents of an encrypted disk is much faster and easier.

Key features:

  • Lets you quickly create an archive from the disk container:
  • Remembers what folder the archive was created in. You can later copy an image with just one click;
  • Gives you the possibility of setting how often backup copies are made. For this, tick the box next to the option “Automatically create backup into these folders every XX days” where XX is the frequency you want. (This function is currently being developed and will become available shortly.)

New in this version:

  • Rohos Disk Portable is open source;
  • Additional support for Bulgarian and Turkish languages;
  • Improved support for Windows 10;
  • Improved Rohos Disk Browser for 64-bit applications;
  • Improved compatibility with Google Drive and Dropbox.
  • Now they will update the disk image in the cloud with the frequency you specify instead of doing this only each time that the disk is enabled or disabled. (This function is currently being developed and will become available shortly.)

Here the settings for the disk are stored, showing where its contents are copied to:

They are individual for each disk for which a backup copy has been created.

Command line for Rohos Disk

$
0
0

Rohos Disk Encryption has a few command line options, so that the encrypted disk can be connected and disconnected by using shortcuts or a BAT file.

agent.exe "c:\My Documents\rdisk.rdi" /letter:Z: /log

or

agent.exe \_rohos\rdisk.rdi

Request a password to connect Rohos disk rdisk.rdi.

/letter:Z: – the drive letter it will be connected (optional)
/log – allows creating a log file (agent.log) when performing the operation. Only when the disk is mounted from a USB drive.
/password – allows specifying a password for Rohos disk

Second option would unmount the disk, which is located on the USB drive.

agent.exe /unmount:Z: 

Disconnect Rohos disk Z:

agent.exe /unmount:ALL
Rohos will disconnect all of  the Rohos drives.

Rohos Disk shortcuts

Rohos Disk Encryption allows creating a disk shortcuts on the desktop or any other place. When you double click this shortcut you will be prompted to enter a password to connect this Rohos disk.

On the screen shot you can see how to make disk shortcut for any Rohos disk using “Tools” menu:

After you created disk shortcut, you may find it on the desktop and edit properties to specify the drive letter it will be connected with:

Automatic disk off upon user idle time

A user also can automate Rohos Disk security, in other words automatically disconnect it after 30 minutes of user’s inactivity.

Here is a BAT file for this:

schtasks.exe /create /tn Turn_Off_Rohos_Disk_On_Idle /tr “\”c:\program files\rohos\agent.exe\” /unmount:R:” /sc ONIDLE /i 15 /ru “System”

where :
“/tn Turn_Off_Rohos_Disk_On_Idle” task name
“/unmount:R:” – disk letter to disconnect
“/i 15” – inactivity timeout in minutes.
“/ru “System”” – user name that will be used to execute the command.

Rohos Disk Encryption for Mac OS X

$
0
0

Rohos disk under mac os xRecently we have come across wonderful application Parallels Desktop 4.0 for Mac OS X. It allows to use Windows applications under Mac seamlessly.  We tested Rohos Disk and Rohos Mini Drive under Parallels (+winxp) and figured out that we don’t need to port Rohos Disk under Mac OS X :).

It works greatly under Parallels virtual PC!

1. Rohos Disk Encryption test results:
it works!

  • Rohos Disk icon appears in the status area, so you can easily open virtual encrypted container
  • Rohos Disk letter appears on the Mac desktop, so you can use it from any Mac OS X application to protect any file or folder
  • Rohos Disk notification may appear twice

2. Rohos Mini Drive tests:

  • after you plug in USB stick protected with Rohos, redirect it into Windows virtual PC.
  • then click Start (Windows Menu) > My Computer > F:\  (your USB drive letter) and open Rohos Mini.exe
  • enter secure partition password
    > Rohos icon will apear in the status area
    > Rohos disk letter will appear on the Mac desktop

The last thing we would like to test is how to integrate Windows Send-To menu into Mac OS X context menu so it’d allow to send files into Rohos drive.

How to safely re-format USB Flash Drive into NTFS

$
0
0

Rohos Disk Encryption software creates hidden and protected partition on the USB flash drive. With the help of the program you may password-protect a part of your USB flash drive and open it on any computer by simply entering your password.

Since most USB Flash drives, even the larger ones, are normally formatted with the FAT32 file system – there are limitation on the maximum size of the encrypted partition of 2 or 4 GB (max file size limitation).

In order to create a secured partition that is bigger than 2 Gb you need to change your USb stick into NTFS format.

Before changing the file system on a USB drive care should be taken to backup any critical data on it just in case the process does not work.


1. Converting the USB File System to NTFS

The simplest way to change the file system on a USB drive, especially if it already has files on it, is to convert it. This method does not delete the existing files. If the files being converted are large or many, the process might take a few minutes. Things will go alot faster if the drive is empty because you moved them temporarily to a different location.

To convert the drive follow these steps:

  1. Connect the USB drive to the computer and make a note of the drive letter assigned to it
  2. Open a command prompt by clicking on: Start > All Programs > Accessories
  3. At the command prompt type: CONVERT F: /FS:NTFS (where F: is your USB drive letter)

If any error messages are generated during step 3 above, this can often be taken care of by running the command: CHKDSK U: /F and then trying the convert command again. The conversion process can be verified by going to “My Computer” and checking the file system name in the properties of the drive. Trying to copy a file larger than 2 gigabytes or changing permissions on a file would also confirm that the process worked.

2. Format the USB File System as NTFS

Formatting the USB drive is definitely faster than converting it, but all files on the drive will be lost. This method is best used when the USB drive has just been purchased. Some drives have resources and tools on them at the time of purchase however, and its a good idea to protect these.

To format follow these steps:

  1. Connect the USB drive to the computer and make a note of the drive letter assigned to it
  2. Open a command prompt by clicking on: Start > All Programs > Accessories
  3. At the command prompt type: FORMAT U: /FS:NTFS (where U is your USB drive letter)

If there is an error message about lack of support for NTFS on the USB drive, this can be changed by going to the properties of the drive in “Device Manager”. Under the “Disk drives” section, change the properties of the USB drive “Policies” page to “Optimize for performance”.

Making the decision to change the file system on a USB drive should be done with care. Before proceeding, weigh the advantages over using FAT32, backup critical data in case the process does not work and consider compatibility issues with non-Windows operating systems.

! Please, note that it’s highly recommended to regularly (once per month) make backup of Rohos encrypted partition that is on your USB flash drive. Just make a copy of F:\_rohos\rdisk**.rdi file.

How to backup data on the USB drive secured partition

$
0
0

Rohos Disk Encryption software allows users to have  new secure storage on a computer or USB flash drives. In this post we would like to underline the importance of data back-up especially if you are using Rohos disk on USB flash drives. Due to nature of USB flash drives (portable and special memory design) its memory is subject to external influence and the data integrity is not so strong.

Most people realize the importance of data back-up after the disaster has happened:

  • they lost USB stick with secured partition on it
  • after a couple of month of using secure partition on the USB flash drive it has numerous of File System errors due to missed Disk Check procedures
  • after an occasional (but still possible) USB memory data sector failure a part or entire secure Rohos partition is damaged

In fact making a per-month back-up copy of the Rohos Disk is an easy 5-minute procedure. There are two ways to make back-up:

  1. When the Rohos Disk is OFF – make a copy of entire rdisk**.rdi file (rohos disk image file)
    1. Press Win+R and type “f:\_rohos\” to open the Explorer on this folder (f:\ – is your USb drive)
    2. Copy rdisk**.rdi file into a back-up location.
      OR
      Drag-and-drop rdisk**.rdi file into a DVD-Recorder software to burn the back-up into DVD disk.
  2. When the Rohos Disk is ON (visible as drive letter) – Make a copy of Rohos disk content by using Windows or other backup software: Windows XP Backup Made Easy.

In next version of Rohos Disk Encryption 1.7 and Rohos Mini Drive 1.7 we plan to implement a reminder and help functions to automate and simplify data back-up on the Rohos secure drives.


Rohos Disk and Rohos Mini 2.3

$
0
0

July 1, 2016 saw the release of new versions of Rohos Disk Encryption and its free counterpart Rohos Mini. These applications received a facelift and improved internal design.

Now you can make a full backup of your disk with just one click (using the Create Backup command). If a backup has already been created earlier, then its location is immediately shown in the dialog. By clicking on this line, you can command the application to overwrite the backup copy at this location. A backup can be stored either on the local PC or in a network folder. Please note that a backup is also an encrypted file container.

It has become popular of late to store an encrypt disk on a cloud service, such as Google Drive or Dropbox. The folder where the disk’s file container is located, will be synced with the cloud service, and as soon as the date of a changed file changes, it will be uploaded to the cloud. However, as the size of a container can grow quite large, syncing it requires a lot of time and computing resources. That’s why the Rohos Disk developers have added a field where you can specify how often the file container should be synced.

5 — default, syncing will be done no more than once every 5 days

3 — syncing once every 3 days

1 — daily syncing

In the same dialog you’ll find a command to set up a file to reset the password (Create Password Reset File).

The functionality for changing the password has been moved to the Tools menu, which appears when a disk is connected. In addition, you’ll also find here other commands for working with this disk: delete, resize, create a shortcut, or check for errors.

The Help menu has also changed: you will now find here functions to register applications, restore a disk, and check for updates.

The application’s internal design has greatly changed:

  • Fixed a bug when changing the password;
  • Added ability to change the disk configuration from the command line;
  • Improved way of updating a disk located in a folder and synced with cloud services (Google Drive and Dropbox). Now the disk won’t be uploaded completely, consuming traffic and impacting your connection speed, but instead only that part of files which have changed will be updated. In addition, you can now specify how often syncing should be carried out;
  • New feature to create encrypted images directly on DVD, to distribute documents and software that require a higher degree of security.

You can read more about these changes and much else besides in our following posts.

We also regret to inform you that we have ceased development of the Windows XP version of our application. We hope that this will not cause any inconvenience. You can download applications compatible with earlier versions of Windows from our software archive.

Rohos Disk Encryption for Mac OS X

$
0
0

Rohos disk under mac os xRecently we have come across wonderful application Parallels Desktop 4.0 for Mac OS X. It allows to use Windows applications under Mac seamlessly.  We tested Rohos Disk and Rohos Mini Drive under Parallels (+winxp) and figured out that we don’t need to port Rohos Disk under Mac OS X :).

It works greatly under Parallels virtual PC!

1. Rohos Disk Encryption test results:
it works!

  • Rohos Disk icon appears in the status area, so you can easily open virtual encrypted container
  • Rohos Disk letter appears on the Mac desktop, so you can use it from any Mac OS X application to protect any file or folder
  • Rohos Disk notification may appear twice

2. Rohos Mini Drive tests:

  • after you plug in USB stick protected with Rohos, redirect it into Windows virtual PC.
  • then click Start (Windows Menu) > My Computer > F:\  (your USB drive letter) and open Rohos Mini.exe
  • enter secure partition password
    > Rohos icon will apear in the status area
    > Rohos disk letter will appear on the Mac desktop

The last thing we would like to test is how to integrate Windows Send-To menu into Mac OS X context menu so it’d allow to send files into Rohos drive.

How to safely re-format USB Flash Drive into NTFS

$
0
0

Rohos Disk Encryption software creates hidden and protected partition on the USB flash drive. With the help of the program you may password-protect a part of your USB flash drive and open it on any computer by simply entering your password.

Since most USB Flash drives, even the larger ones, are normally formatted with the FAT32 file system – there are limitation on the maximum size of the encrypted partition of 2 or 4 GB (max file size limitation).

In order to create a secured partition that is bigger than 2 Gb you need to change your USb stick into NTFS format.

Before changing the file system on a USB drive care should be taken to backup any critical data on it just in case the process does not work.


1. Converting the USB File System to NTFS

The simplest way to change the file system on a USB drive, especially if it already has files on it, is to convert it. This method does not delete the existing files. If the files being converted are large or many, the process might take a few minutes. Things will go alot faster if the drive is empty because you moved them temporarily to a different location.

To convert the drive follow these steps:

  1. Connect the USB drive to the computer and make a note of the drive letter assigned to it
  2. Open a command prompt by clicking on: Start > All Programs > Accessories
  3. At the command prompt type: CONVERT F: /FS:NTFS (where F: is your USB drive letter)

If any error messages are generated during step 3 above, this can often be taken care of by running the command: CHKDSK U: /F and then trying the convert command again. The conversion process can be verified by going to “My Computer” and checking the file system name in the properties of the drive. Trying to copy a file larger than 2 gigabytes or changing permissions on a file would also confirm that the process worked.

2. Format the USB File System as NTFS

Formatting the USB drive is definitely faster than converting it, but all files on the drive will be lost. This method is best used when the USB drive has just been purchased. Some drives have resources and tools on them at the time of purchase however, and its a good idea to protect these.

To format follow these steps:

  1. Connect the USB drive to the computer and make a note of the drive letter assigned to it
  2. Open a command prompt by clicking on: Start > All Programs > Accessories
  3. At the command prompt type: FORMAT U: /FS:NTFS (where U is your USB drive letter)

If there is an error message about lack of support for NTFS on the USB drive, this can be changed by going to the properties of the drive in “Device Manager”. Under the “Disk drives” section, change the properties of the USB drive “Policies” page to “Optimize for performance”.

Making the decision to change the file system on a USB drive should be done with care. Before proceeding, weigh the advantages over using FAT32, backup critical data in case the process does not work and consider compatibility issues with non-Windows operating systems.

! Please, note that it’s highly recommended to regularly (once per month) make backup of Rohos encrypted partition that is on your USB flash drive. Just make a copy of F:\_rohos\rdisk**.rdi file.

ruToken in Rohos Logon Key and Rohos Disk

$
0
0

rutoken.gif
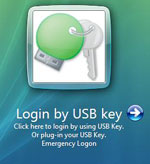
Now the popular token ruToken can be used in Rohos Logon Key and Rohos Disk programs as a single Key for Windows (including Vista x86/x64) authentication, and for data protection on Rohos Disk. To read more in ruToken Project News…

Rohos Disk. Virtual Keyboard and Autorun.

$
0
0

Rohos Disk Encryption new release from June 05 now allows more efficiently password protect your USB flash drive – with Virtual Keyboard. As the response to multiple users’ request we added Virtual Keyboard that enables the program’s user to safely enter a password without been traced by a key logger while working on a guest’s computer.
In the Rohos password access box there is a new button, clicking on which enables virtual keyboard.

And Autorun folder – all shortcuts in this folder will be automatically started when virtual Rohos drive is connected. Users can Save and Delete shortcuts there manually. If you don’t have this folder just create it.

These features are now available both in Rohos Disk Encryption and Rohos Mini Drive – wonderful tools to password protect and secure your mobile data.

Command line for Rohos Disk

$
0
0

Rohos Disk Encryption has a few command line options, so that the encrypted disk can be connected and disconnected by using shortcuts or a BAT file.

agent.exe "c:\My Documents\rdisk.rdi" /letter:Z: /log

or

agent.exe \_rohos\rdisk.rdi

Request a password to connect Rohos disk rdisk.rdi.

/letter:Z: – the drive letter it will be connected (optional)
/log – allows creating a log file (agent.log) when performing the operation. Only when the disk is mounted from a USB drive.
/password – allows specifying a password for Rohos disk

Second option would unmount the disk, which is located on the USB drive.

agent.exe /unmount:Z: 

Disconnect Rohos disk Z:

agent.exe /unmount:ALL
Rohos will disconnect all of  the Rohos drives.

Rohos Disk shortcuts

Rohos Disk Encryption allows creating a disk shortcuts on the desktop or any other place. When you double click this shortcut you will be prompted to enter a password to connect this Rohos disk.

On the screen shot you can see how to make disk shortcut for any Rohos disk using “Tools” menu:

After you created disk shortcut, you may find it on the desktop and edit properties to specify the drive letter it will be connected with:

Automatic disk off upon user idle time

A user also can automate Rohos Disk security, in other words automatically disconnect it after 30 minutes of user’s inactivity.

Here is a BAT file for this:

schtasks.exe /create /tn Turn_Off_Rohos_Disk_On_Idle /tr “\”c:\program files\rohos\agent.exe\” /unmount:R:” /sc ONIDLE /i 15 /ru “System”

where :
“/tn Turn_Off_Rohos_Disk_On_Idle” task name
“/unmount:R:” – disk letter to disconnect
“/i 15” – inactivity timeout in minutes.
“/ru “System”” – user name that will be used to execute the command.

Setting up shared access to an encrypted disk

$
0
0
Rohos Disk Encryption allows you to set up shared access to an encrypted disk for different uses: Shared access for all users on a single computer. For example, on Windows Terminal Services, In this case, users do not need to know the password for the disk, and they do not need to launch Rohos Disk. […]

Rohos Disk and Rohos Mini 2.3

$
0
0
July 1, 2016 saw the release of new versions of Rohos Disk Encryption and its free counterpart Rohos Mini. These applications received a facelift and improved internal design. Now you can make a full backup of your disk with just one click (using the Create Backup command). If a backup has already been created earlier, […]

Backup copies made faster in Rohos Disk Encryption 2.2

$
0
0
Rohos Disk ensures that your data is protected from third parties by locking the disk in your absence. The size of the disk can be increased as needed. You can create several disks on a PC, USB flash drive, or a DVD at the same time. We’ve introduced a new version of Rohos Disk — […]

(Soon) Introducing file encryption in new Rohos Disk

$
0
0
We are working to add file encryption feature to Rohos Mini Drive and Rohos Disk Encryption products. This will allow to encrypt separate folders and files stored on a computer. It is designed specially for those who really concerned about data security of confidential information stored in Google Drive or Dropbox. Since both file data […]

Rohos Disk folder encryption for Google Drive / OneDrive

$
0
0
We have published  Rohos Disk Encryption v.2.7 with new experimental functionality “Encrypt Folder”.  This feature that allows to encrypt your Cloud Storage folders like OneDrive, Google Drive and others. Now Rohos is able to encrypt arbitrary files on a computer and thus Cloud Synchronization and Backup tools uploads fully encrypted data to the cloud since […]

New Rohos Disk Encryption app for Android to access encrypted Google Drive folders

$
0
0
New version of Rohos Disk for Android allows to access folder on Google Drive/Dropbox/OneDrive encrypted by Rohos Disk Encryption on Windows. how it works Create encrypted folder in Google Drive backup and sync app by using Rohos Disk Encryption for Windows> Install Rohos Disk for Android app Select encrypted folder, enter password and view your […]
Viewing all 45 articles
Browse latest View live