Quantcast
Channel: Rohos Disk – Rohos
Viewing all 45 articles
Browse latest View live

Rohos Disk for Windows x64 (AMD64, IA64)

$
0
0

vista64.jpgTesline-Service announces that now Rohos Disk and Rohos mini are available both for 32-bytes (x86), and for 64-bytes (x64 – AMD64, IA64) versions.

Disk driver is updated for Windows XP and Vista, thus has been worked out the issue of Rohos Disk functionality in 64-bytes versions of these operational systems.

Note: Rohos Disk current version, v1.19, is not compatible with old drivers. The program should be updated everywhere you use Rohos Disk.


ruToken in Rohos Logon Key and Rohos Disk

$
0
0

rutoken.gifNow the popular token ruToken can be used in Rohos Logon Key and Rohos Disk programs as a single Key for Windows (including Vista x86/x64) authentication, and for data protection on Rohos Disk. To read more in ruToken Project News…

Rohos Disk. Virtual Keyboard and Autorun.

$
0
0

Rohos Disk Encryption new release from June 05 now allows more efficiently password protect your USB flash drive – with Virtual Keyboard. As the response to multiple users’ request we added Virtual Keyboard that enables the program’s user to safely enter a password without been traced by a key logger while working on a guest’s computer.
In the Rohos password access box there is a new button, clicking on which enables virtual keyboard.

And Autorun folder – all shortcuts in this folder will be automatically started when virtual Rohos drive is connected. Users can Save and Delete shortcuts there manually. If you don’t have this folder just create it.

These features are now available both in Rohos Disk Encryption and Rohos Mini Drive – wonderful tools to password protect and secure your mobile data.

How to Repair Rohos Disk

$
0
0

The guide – How To Repair Rohos Disk – is a part of Rohos Disk Help files.  The Rohos guide will help you to: Create Password Reset File, Recover encrypted disk if you lost your password, Restore encrypted partition on a USB flash drive is case of data corruption, Check rohos disk for errors, recover files from corrupted Rohos disk.

Create password reset file

(backup copy of cryptographic keys for disk encryption)

The program allows creating a password reset file for Rohos Disk. If you forget disk password you will be able to set new password and get access to the disk by means of this file. It makes no difference how many times the disk password has been changed, this file is created once.

How to create password reset file:

  • Connect Rohos disk
  • On the program’s main window click on Tools… and choose “Create password reset file” link
  • You should specify path to disk image-file in opened dialog. If main disk is on, this path will be set automatically. You may also specify whatever disk image you want to have
  • Then enter disk password and press Create backup
  • Spare copy will be created

Warning: The backup file must be kept in secret otherwise another user can use it to access the encrypted disk.

Disk recovering

Warning: Make sure the disk is turned off before it’s recovered.

This function helps to recover Rohos disk or disk password.

How to use this function:

  • Go to Restore disk link in Rohos Disk main window

In opened dialog you should click on:

1. Specify path to disk backups file (*.RDI1 or *.RDX).
The path C:\Users\Account Name\AppData\Local\Rohos opens predefined folder . (only Account Name changes in the path indicated).

Path to disk backups file (*.RDX file – for disk password recovering, *.RDI1 file for disk recovering) RDX file must be created by user beforehand. RDI1 file is created automatically by program with disk image.

  • the program automatically opens the folder that contains your backups file *.rdi1. It increase probability for success on condition that restoring back up file from the computer Rohos disk was created.
  • click on appropriate *.rdi1 file and then Open. All *.rdi1 files in the backup folder indicate size inside the file name. It may help you to recognize your file to restore disk image.

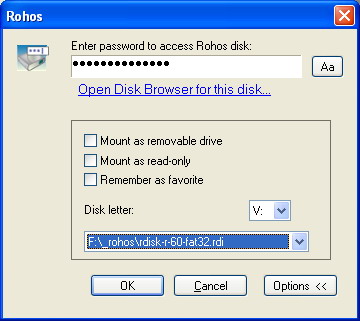
2. Specify path to disk image-file *.rdi.

  • Enter in password input line the current disk password, if *.rdi1 file was chosen.

  • Press OK – There will be an attempt to turn on the disk.

The disk can turn on but it won’t be formatted – DO NOT FORMAT IT because it can lead to data loss.

If disk is not formatted it means that you’ve used wrong *.RDX or *.RDI1 file from wrong file image.

If you recover main disk and it is still shown as unformatted:

- try to open favorite disk with “Connect more…” command.

Restoring Encrypted part on the USB flash drive

When you can’t find the disk’s image on the USB you should look for the Rohos image in the Folder F:\_rohos\ (where F is the letter of your USB flash drive). Usually disk image file looks like rdisk*rdi (its size is from 10 Mb to several Gbs). The Folder _rohos is hidden and in the file explorer it’s not seen. In order to open it you should:

  • Open menu Start -> press Win + R
  • Type in “F:\_rohos\ (or any other letter of your USB flash drive) and click OK

If you restore disk, then in the dialog box *RDI1, *RDX in the file name field you should choose F:\_rohos\ and then press Enter to be directed to the Folder.

Disk checking

Open Rohos Disk Encryption main window, connect your encrypted Rohos disk and  click on Tools… and choose “Check disk” (as shown on the screen shot below). By means of this command disk will be checked for File-System errors. It helps in case disk doesn’t turn on or it is shown as unformatted. This command can be used only when the encrypted disk is on.

This command forcedly runs Windows Check Disk utility to repair Rohos Disk. Or it can be started manually:

  • Start button -> Execute
  • Enter command line “chkdsk.exe r: /f /x”, where R: your disk letter.
  • After command execution there will be a window with black background. You need to wait till it is shut.
  • After disk checking ends you may try to turn it on and turn it off again.

The disk is shown as unformatted

Warning: In case you used Rohos disk successfully beforehand and suddenly it is shown as unformatted  then DO NOT FORMAT IT again.

Please note that Rohos Disk automatically format newly created encrypted disk into NTFS. In some cases that can’t be done so disk remains unformatted and you need to format it manually (right click on disk letter in ‘My Computer’ and choose ‘Format’).

If your Rohos disk suddenly is shown as unformatted we recommend to:

  1. Restart your computer and try to connect Rohos disk again.
  2. Use ‘Check disk’ command (Open Rohos Disk Encryption main window, connect your encrypted Rohos disk and  click on Tools… and choose “Check disk”).
  3. If it doesn’t help then try to turn disk on with “Connect more…” command (you may use USB flash drive as a password)
  4. If it doesn’t help then use Recover disk dialog and one of the backup files or password reset file (RDI1, RDX)
  5. If it doesn’t help then use ‘How to recover corrupted encrypted disk’ section below:

How to recover files from corrupted encrypted disk

Sometimes data corruption on disk drives (specially on USB flash drives) may lead to data corruption within Rohos Disk container. As a result encrypted disk is visible as unformatted or some files/folders may disappear from it.

In this case we would recommend to use freeware PhotoRec utility:
“PhotoRec is file data recovery software designed to recover lost files including video, documents and archives from hard disks, CD-ROMs, and lost pictures (thus the Photo Recovery name) from digital camera memory. PhotoRec ignores the file system and goes after the underlying data, so it will still work even if your media’s file system has been severely damaged or reformatted. “

PhotoRec is able to work with virtual encrypted disk connected as disk letter:

  • PhotoRecis able to restore only Files types that are known to it.
  • If the file is restored successfully it is stored as File1, File2 etc. So the previous file name will be lost.
  • The same for the folders, it restores folder hierarchy but folder names will be Forlder1, Folder2, Folder3 etc.

In our experience it has successfully restored PDF, DOC, DOCX, XLS documents as well as many image formats.

You can use this utility to restore lost files from any media: encrypted disk of any manufacturer, USB flash drives, memory cards.

In case all the methods were tried but you still haven’t recover data you may use Data Recovery Assistance.

Command line for Rohos Disk

$
0
0

Rohos Disk Encryption has a few command line options, so that the encrypted disk can be connected and disconnected by using shortcuts or a BAT file.

agent.exe "c:\My Documents\rdisk.rdi" /letter:Z: /log

or

agent.exe \_rohos\rdisk.rdi

Request a password to connect Rohos disk rdisk.rdi.

/letter:Z: – the drive letter it will be connected (optional)
/log – allows creating a log file (agent.log) when performing the operation. Only when the disk is mounted from a USB drive.
/password – allows specifying a password for Rohos disk

Second option would unmount the disk, which is located on the USB drive.

agent.exe /unmount:Z: 

Disconnect Rohos disk Z:

agent.exe /unmount:ALL
Rohos will disconnect all of  the Rohos drives.

Rohos Disk shortcuts

Rohos Disk Encryption allows creating a disk shortcuts on the desktop or any other place. When you double click this shortcut you will be prompted to enter a password to connect this Rohos disk.

On the screen shot you can see how to make disk shortcut for any Rohos disk using “Tools” menu:

After you created disk shortcut, you may find it on the desktop and edit properties to specify the drive letter it will be connected with:

Automatic disk off upon user idle time

A user also can automate Rohos Disk security, in other words automatically disconnect it after 30 minutes of user’s inactivity.

Here is a BAT file for this:

schtasks.exe /create /tn Turn_Off_Rohos_Disk_On_Idle /tr “\”c:\program files\rohos\agent.exe\” /unmount:R:” /sc ONIDLE /i 15 /ru “System”

where :
“/tn Turn_Off_Rohos_Disk_On_Idle” task name
“/unmount:R:” – disk letter to disconnect
“/i 15″ – inactivity timeout in minutes.
“/ru “System”” – user name that will be used to execute the command.

Rohos Disk Encryption for Mac OS X

$
0
0

Rohos disk under mac os xRecently we have come across wonderful application Parallels Desktop 4.0 for Mac OS X. It allows to use Windows applications under Mac seamlessly.  We tested Rohos Disk and Rohos Mini Drive under Parallels (+winxp) and figured out that we don’t need to port Rohos Disk under Mac OS X :).

It works greatly under Parallels virtual PC!

1. Rohos Disk Encryption test results:
it works!

  • Rohos Disk icon appears in the status area, so you can easily open virtual encrypted container
  • Rohos Disk letter appears on the Mac desktop, so you can use it from any Mac OS X application to protect any file or folder
  • Rohos Disk notification may appear twice

2. Rohos Mini Drive tests:

  • after you plug in USB stick protected with Rohos, redirect it into Windows virtual PC.
  • then click Start (Windows Menu) > My Computer > F:\  (your USB drive letter) and open Rohos Mini.exe
  • enter secure partition password
    > Rohos icon will apear in the status area
    > Rohos disk letter will appear on the Mac desktop

The last thing we would like to test is how to integrate Windows Send-To menu into Mac OS X context menu so it’d allow to send files into Rohos drive.

How to safely re-format USB Flash Drive into NTFS

$
0
0

Rohos Disk Encryption software creates hidden and protected partition on the USB flash drive. With the help of the program you may password-protect a part of your USB flash drive and open it on any computer by simply entering your password.

Since most USB Flash drives, even the larger ones, are normally formatted with the FAT32 file system – there are limitation on the maximum size of the encrypted partition of 2 or 4 GB (max file size limitation).

In order to create a secured partition that is bigger than 2 Gb you need to change your USb stick into NTFS format.

Before changing the file system on a USB drive care should be taken to backup any critical data on it just in case the process does not work.


1. Converting the USB File System to NTFS

The simplest way to change the file system on a USB drive, especially if it already has files on it, is to convert it. This method does not delete the existing files. If the files being converted are large or many, the process might take a few minutes. Things will go alot faster if the drive is empty because you moved them temporarily to a different location.

To convert the drive follow these steps:

  1. Connect the USB drive to the computer and make a note of the drive letter assigned to it
  2. Open a command prompt by clicking on: Start > All Programs > Accessories
  3. At the command prompt type: CONVERT F: /FS:NTFS (where F: is your USB drive letter)

If any error messages are generated during step 3 above, this can often be taken care of by running the command: CHKDSK U: /F and then trying the convert command again. The conversion process can be verified by going to “My Computer” and checking the file system name in the properties of the drive. Trying to copy a file larger than 2 gigabytes or changing permissions on a file would also confirm that the process worked.

2. Format the USB File System as NTFS

Formatting the USB drive is definitely faster than converting it, but all files on the drive will be lost. This method is best used when the USB drive has just been purchased. Some drives have resources and tools on them at the time of purchase however, and its a good idea to protect these.

To format follow these steps:

  1. Connect the USB drive to the computer and make a note of the drive letter assigned to it
  2. Open a command prompt by clicking on: Start > All Programs > Accessories
  3. At the command prompt type: FORMAT U: /FS:NTFS (where U is your USB drive letter)

If there is an error message about lack of support for NTFS on the USB drive, this can be changed by going to the properties of the drive in “Device Manager”. Under the “Disk drives” section, change the properties of the USB drive “Policies” page to “Optimize for performance”.

Making the decision to change the file system on a USB drive should be done with care. Before proceeding, weigh the advantages over using FAT32, backup critical data in case the process does not work and consider compatibility issues with non-Windows operating systems.

! Please, note that it’s highly recommended to regularly (once per month) make backup of Rohos encrypted partition that is on your USB flash drive. Just make a copy of F:\_rohos\rdisk**.rdi file.

How to backup data on the USB drive secured partition

$
0
0

Rohos Disk Encryption software allows users to have  new secure storage on a computer or USB flash drives. In this post we would like to underline the importance of data back-up especially if you are using Rohos disk on USB flash drives. Due to nature of USB flash drives (portable and special memory design) its memory is subject to external influence and the data integrity is not so strong.

Most people realize the importance of data back-up after the disaster has happened:

  • they lost USB stick with secured partition on it
  • after a couple of month of using secure partition on the USB flash drive it has numerous of File System errors due to missed Disk Check procedures
  • after an occasional (but still possible) USB memory data sector failure a part or entire secure Rohos partition is damaged

In fact making a per-month back-up copy of the Rohos Disk is an easy 5-minute procedure. There are two ways to make back-up:

  1. When the Rohos Disk is OFF – make a copy of entire rdisk**.rdi file (rohos disk image file)
    1. Press Win+R and type “f:\_rohos\” to open the Explorer on this folder (f:\ – is your USb drive)
    2. Copy rdisk**.rdi file into a back-up location.
      OR
      Drag-and-drop rdisk**.rdi file into a DVD-Recorder software to burn the back-up into DVD disk.
  2. When the Rohos Disk is ON (visible as drive letter) – Make a copy of Rohos disk content by using Windows or other backup software: Windows XP Backup Made Easy.

In next version of Rohos Disk Encryption 1.7 and Rohos Mini Drive 1.7 we plan to implement a reminder and help functions to automate and simplify data back-up on the Rohos secure drives.


Rohos Disk for YubiKey

$
0
0

Especially for YubiKey users Tesline-Service would like to announce Rohos Disk v.1.30 beta release. Now you may securely access your encrypted partition just by one touch. Nice and easy!

Download Rohos Disk v.1.30 (beta)

YubiKey benefits in Rohos Disk:

  • No need to re-program YubiKey in static mode; both YubiKey configurations are supported
  • Rohos Disk allows to authenticate YubiKey OTP against any server (Yubico server settings included)
  • Also there is an option to enter YubiKey’s AES key so Rohos Disk could decrypt and verify it locally

If you re-programed YubiKey in a static password mode, you can also use it in Rohos Disk.

You may see the video on “How to Access Rohos Disk with YubiKey

Here are some screen shots:


Rohos Disk Encryption v.1.3

$
0
0

We are glad to announce Rohos Disk Encryption v.1.3 release. Now Rohos Disk Encryption is independent from some Rohos Logon Key settings, e.g. USB key choise, and also the program has data backup reminder if the password protected part is located on a USB flash drive.

What’s new:

  1. USB key settings are independent from Rohos Logon Key. Upon choosing new USÐ’ key it immediately comes into effect.
  2. There is new module in the program – “Rohos Disk service”, it’s in charge of disk’s autonomous operation (e.g., upon PC shutdown Rohos disk will be disconnected only after all other programs have  stopped using the encrypted disk).
  3. Convenient display of several connected Rohos disks in the program’s Main Window. Now additional disks could be easily checked for errors, it’s easy to create a backup copy of encryption keys and even to restore them.

  4. New options:
    1. Rohos icon not to be showed in tray near the clock
    2. Automatically disconnect disk upon Log Off
    3. Automatically connect disk upon plugging in a USB key (should be set up beforehand)
  5. Additional params in dialog “Connect disk”:
  • Check boxes – Mount disk as “Mount as read-only”, “Mount as removable drive “
  • Choose disk letter

6.  Now it’s possible to create several encrypted disks on one USВ flash drive. Upon connecting it’d be possible to choose which one to connect (only 1 at a time).
7.  Automatic Notification of data backup copy of Rohos disk.  For disks that are located on a USB drives it would be every 39th day, for others it’d be every 75th day.
8.  Although Rohos Disk Encryption allows to create 2 and more encrypted partitions, it’s possible to connect only a single volume at a time

9.  Also other bugs have been fixed

Screen shot:

Rohos Disk v.1.4

$
0
0

We are glad to announce Rohos Disk Encryption v.1.4

What’s new:

  • More tools for additional disks: Browse, Create disk shortcut.
  • New “Options” allows to choose/change UI language and enable/disable log files
  • Now by default Rohos doesn’t write log files for troubleshooting purposes
  • Improvements in “Connect Disk” dialog
  • Minor fixes and UI improvements in main window
  • Fixed Autorun feature. Now Rohos correctly runs shortcuts with command line options.

Screen shots:

Rohos Disk v.1.5 – new Rohos Disk Browser

$
0
0

(updated on July, 24)

We are glad to announce new Rohos Disk and Rohos Mini v.1.5  with updated Rohos Disk Browser application. Rohos Disk Browser enables you to open and view the contents of secret partitions on a USB drive on any other computer, even if you do not have administrative rights.

Download v.1.5

What’s new:

  1. List of file names now are sorted in alphabetic order
  2. List of files now has a small icons and looks just like in Explorer
  3. Fixed bug of wrong folder icon under Vista/Seven
  4. Improved Unicode support for FAT/FAT32
  5. Added Virtual Keyboard. Press “***” button to open VK and click it to type in your password.
  6. Improved translation handling. Now language is automatically taken from global settings. However there are translation issues  – if Disk Browser is opened without Admin rights on Vista (enabled UAC), therefore it is recommended to run Rohos Disk Browser with full privileges.
  7. Improved error reporting
  8. Fixed bug in Rohos Disk driver that leads to Windows Error (Blue Screen) after pulling out USB drive (that contains Rohos disk container file) without disconnecting Rohos disk.
  9. Added Traditional Chinese language UI
  10. Added Umikey OTP token support.

Screen shot:

List of file names are in alphabetic order

Rohos Disk v.1.6. Rohos Disk Browser supports NTFS in “read-write” mode.

$
0
0

Exciting news!

Rohos Disk Encryption brings new and exciting opportunities for its users  to work with encrypted partition created on USB flash drive in NTFS format. Now NTFS partitions opened on a PC with no Admin rights via Rohos Disk Browser work in “read-write” mode.

Rohos Disk Encryption is one of the leading solutions for data security has enhanced opportunity to use your secured disk in the most effective way. Having large encrypted partitions, e.g. 100 GB, you easily work (read and edit) with your data on any PC.

Download v.1.6

What’s new:

Rohos Disk Encryptionchoose the right solution for your precious data security.

Encrypted files are one click away with Rohos Disk v.1.7

$
0
0

Your USB flash drive data protection and its portability demands are increasing, yet with today’s offers we have in software community there are small chances you might find a worthwhile application.

So what do you use to password protect your USB drive and have secure access to your encrypted partition on Public PCs without having administrative rights?

Long time anticipated by fans of portable encryption solutions possibility to create an encrypted area on a USB disk/key that a user can open/mount, double click and open the files, and close as required, without Admin rights is now implemented in Rohos Data Security solutions Rohos Disk Encryption and Rohos Mini Drive. You do not need Administrative privileges, and yet you can double click and open say a Word doc, and then save it to the same place without leaving any traces of working with it.

You may say – “There are solutions that have a portable disk Explorer utility that allows working with an encrypted disk without Admin rights”. Yes, but very few disk encryption solutions provide decent disk Explorer performance. Meaning that in many of them you can only extract a file outside the disk Explorer and then open it.  After some changes to the file have been done, if any, you should Import file back to the Disk Explorer. In this case “on-the-fly” encryption principle doesn’t work.  The obvious disadvantages of such approach – ‘unencrypted files’ may be left behind on a guest PC or unsecured part of the USB flash drive, and you can’t work with big files.

Try Rohos Disk Encryption (shareware) or Rohos Mini Drive (freeware) and discover:

  • File Virtualization. Open files via Rohos Disk Browser in associated application without first decrypting them into temporary folder. Rohos virtualizes file presence for the application, thus it works with encrypted file by using “on-the-fly” encryption principle.

How does it work:

  1. When you double-click on a document in Rohos Disk Browser, it searches for associated application.
  2. Then Rohos launches this application with File Virtualization embedded module and a virtual file name as a command line.
  3. Application opens this file, but all read\write requests are passed to Rohos Disk Browser.
  4. Rohos Disk Browser encrypts or decrypts ‘on-the-fly’ a needed file portion in rеturn.
  5. It’s not possible to open the Virtual File with any other application except within the one that was launched by Rohos Disk Browser. Learn more
  • By default, Rohos disk file system is NTFS.
  • As it’s highly recommended to regularly (once per month) make backup of Rohos encrypted partition that is on your USB flash drive, we added Rohos Backup Reminder to help you in this matter.


Rohos Mini and Rohos Disk v.1.8. Keep folders hidden!

$
0
0

(updated February 10, 2011)

You share your computer with somebody but would rather keep your data private??? It’s not always possible. Using Google Chrome, Mozilla Firefox and Skype??? Well, for an experienced user it’s a piece of cake to find and look through your Skype chat’s logs without being signed into your account. And now you can keep all those gawkers away from your computer data with Rohos encryption programs.

Rohos Developers have been asked to implement Hide folder feature which in future will eventually step-by-step lead to the long-awaited feature – complete Account Encryption (all applications and data are encrypted) but about this you’ll learn more later.

Hide folder option in Rohos Mini Drive and Rohos Disk Encryption brings affordable and AES 256 strength encryption solution to your security issues by preventing unauthorized access to your private data in PC folders by local or network users. Your protected items can be quickly and easily rendered inaccessible to other users but are instantly accessible when you turn on your Rohos disk.

What’s new:

  1. Added Hide folder option. No extra complicated steps to be taken to hide folder with your private data, just a few clicks.

    How it works:

    Turn on your Rohos disk -> click on Hide folder link in the program’s main window -> there are given predefined folders, e.g. My Documents, Google Chrome data, Skype, etc. You’ll need to choose a folder that will be linked with your Rohos disk.

    or
    you may specify manually the path to the whatever folder you wish to hide

    Click OK.

    From now on you folder will be encrypted and hidden, and accessible only after your Rohos disk is turned on. When it comes to Skype, Google Chrome and Mozilla Firefox, if Rohos disk is not turned on these applications won’t start.

    Manage encrypted and hidden folders

    You may cancel this encryption feature any time.

  • Open Rohos Disk Application and connect encrypted disk R:\
  • Click on “Hide Folder”
  • Choose an Application profile or select any path that you have encrypted previously.
  • Rohos application checks the folder and you may:

  1. Click “Restore Link” in order to re-link application profile folder with the profile folder you have on your Rohos disk. This will allow using a single Google Chrome profile on a few Windows computers.
  2. Click “Delete Link” if you uninstalled Application or you don’t want anyone to know you have this application profile encrypted with Rohos Disk. Next time you will need to use “Repair” in order to use Google Chrome.
  3. Click “Unhide Folder” if you want to cancel this encryption feature or you want to delete Rohos disk.

Please note, this encryption feature links Google Chrome profile with your primary encrypted disk created in Rohos Disk (Rohos Mini Drive) application. By deleting encrypting disk you also delete your Google Chrome profile. If you forget your password from Rohos Disk you may loose your Google Chrome profile also. To prevent this use password reset file.

Hide Folder functional requirements:

  1. There should be enough free space on Rohos Encrypted Drive to keep hidden folder data.
  2. Before starting “Hide Folder” operation make sure the Application you plan on hiding is not working. In other words this application should be closed.
  3. Hide Folder function does not support System folders and User Account folders. This will be implemented in next releases.

Security benefits with Hide Folder feature:

  1. Allows encrypting any regular folder on the computer. Now you don’t need to drag and drop this folder into Rohos Disk as before.
  2. Password protect any Application folder, for example C:\Program Files\QQ
  3. Encrypt and hide your Skype chat, received files, contacts, Skype password
  4. Encrypt and protect Google Chome history, favorites, form data (credit card number), saved passwords.

    2. And the option “Create Rohos disk within media file .AVI, MP3, MPG, WMV, etc” has been moved in lower right corner of the main window (see screen shot of the program’s main window).

    3. Rohos Disk Browser utility is turned into Rohos Mini Drive Portable. Rohos Developers have worked to add features that are one more step towards making completely portable encryption utility. Rohos Mini Drive portable will let you work with your data and applications from virtually encrypted disk on any PC without admin rights, and not only that you are able to create new encrypted disks and change their password.


    4. The bug Trial period has expired  warning was fixed.

  5. Download and install over Rohos Mini Drive v.1.8 or  Rohos Disk Encryption v.1.8


Rohos Logon Key v. 2.9 improvements for Windows 7

$
0
0

Dear users and customers, we are happy to announce a few improvements in Rohos Logon Key. New features affects “Allow login only by USB Key” feature specially when using Rohos Logon in corporate network or Windows Remote Desktop services.

What’s new:

1. When you use “Allow to login only by USB Key” feature, you may define a set of users that will be able still to login by a regular password (without USB Key). Please note:
– Current user name is added to this list automatically by default .
– We recommend to set it to Terminal Server administrator user name
– If it is blank: regular password based login will be disabled for any user (ensure that you have defined Emergency Login or have a valid USB Key)
– Rohos Icon in Credentials Prompt dialog box allows any user name credential to be entered manually.


2. On the Windows 7/2008 logon screen you have Rohos logon icon.

Now it contains User name and password fields. This is designed specially for network Admins to be able to access computer in a regular way locally or via Remote Desktop.


3. User Account Control credentials prompt with Rohos icon. Now you can regular use here User Name and password. Please note – this credentials prompt accepts USB Key or any user name and password entered manually.


4. On Windows 7/ 2008 Rohos logon key creates “Rohos Logon Key (User)” shortcut that allows regular users to setup and manage USB Key for Windows authentication.


5. USB key redirection into Remote Desktop

Rohos Logon Key allows to setup redirected USB flash drive as a Login Key for Windows Remote Desktop.

On the screenshot “\\tsclient\G” is a USB flash drive connected to client PC. After setting up this USB drive it will contain also portable Rohos components to login into Remote Desktop from any PC with this Key (without installing Rohos on it)


A few notes about Windows Remote Desktop services support

Today In most configurations “Network Level Authentication” option is used on a Windows Terminal Server (TS). It  means after providing credentials in the MS Remote Desktop Connection user login straight into Remote Desktop (without entering credentials at login screen).

In this case you need to use “Allow to login only by USB Key” option in Rohos Logon Key (installed on TS). So NLA will be used anyway but in addition require USB Key in Terminal Server login screen. This will enforce 2-factor authentication principle : Remote Desktop users will be able to provide credentials at RDC and USB Key will be verified also.

If you are Network Administrator you will be able to login into TS by using regular username/password .

Remote Desktop connection passthrough

On Windows 7 / Windows 2008 R2 rohos credential provider support passthrough authentication for Remote Desktop login (based on NLA – Network Level Authentication). Once credentials are authenticated via NLA it will be used by Rohos.

To enable this feature: Open Rohos Logon Key > Options > More > and enable “Enable authentication filter”.


Windows 7 / 2008 logon screen editor

Now Rohos Logon allows to edit logon screen picture (background) and user icons.

The list of options you can customize on Windows 7 logon screen by Rohos:

  • Hide Rohos Logon Key icon
  • Change the picture of Rohos Logon Key icon
  • Hide any user icon or just a single icon
  • Change background picture of logon screen

Download Rohos Logon Key release with this improvements.

Safe encryption with Rohos Disk Encryption 1.9

$
0
0

Rohos Disk Encryption 1.9 Release
March 14, 2012.

We announce a release of the advanced version – Rohos Disk Encryption v.1.9 – with the final updates and new function. The Rohos Disk Encryption program allows you to store the information encrypted on any USB flash drive, hard drive or CD/DVD. We use one of the most secure data encryption algorithms – AES 256 bit.  «Encryption on-the-fly» is an instant process hiding your personal information and confidential data any time you work with them.

Advantages of the Rohos Disk

  • Secure storage and transport of personal information on any data storage device
  • The data are encrypted and you are the only one who has access to them. Enter the secret password or insert the USB key and your private disk will be connected for further work with it.
  • The size of the encrypted disk is not limited and it can be increased if required, so, you can protect all the personal info available.

Easy-to-use encryption with the help of Rohos Disk:

  • Set up any USB flash drive as a key to access your private disk. Now, there is no necessity to remember the password to the disk.
  • Reserved copy reminder – this software will inform you just in time whenever a reserved copy of the disk needs to be done.
  • There is no need for prior installation of the program on the host computer to get access to the disk. The portable Rohos Disk Browser utility allows you to open the encrypted Rohos disk on any computer even without requiring any administrative rights.

Let us note some of the Rohos Disk improvements:

  1. We fixed the problem when the interface of the main program window displayed only partially.
  2. As you encrypt the first disk, the folders on it are created by default (documents, programs, etc.) Now after creating the second disk the folders are not generated by default.
  3. We added the function of the forced lock of the encrypted disk in the time interval indicated. The built-in timer will lock the secret disk as soon as the time set by the user expires. If the user has left his computer and is inactive during the whole time interval set or turned on the hibernation mode, the locking function will work automatically. After getting back to work the Rohos Disk will ask for password to the secret disk. You’ll have 25 seconds to enter the password to the secret disk or connect secure USB token – the encrypted key with the password to the disk. If you fail to enter the right password the disk will be disconnected (more…)
  4. Updates in Rohos Disk Browser.

Download Rohos Disk v.1.9 (30 days demo)

ICQ/Skype encryption in Rohos Disk v.2.0

$
0
0

We are glad to announce the release of Rohos Disk 2.0.

Tesline-Service company is always trying to keep up with the trends of IT world, and now it is ready to offer you Rohos software already compatible with Windows 8. The new features have been added to simplify the encryption process without compromising data security. This new encryption feature for folders and applications will make it possible for any PC user to protect their data.

ICQ/Skype encryption

Can you ever imagine your virtual life without instant messengers like ICQ or Skype? You’ll probably say it is hardly possible. Yes. It seems to be true. Most of users can hardly imagine their everyday life without all these cyber tools, and, after all, why should we deprive ourselves of convenience and comfort while communicating with our business partners or friends, or while performing free calls or exchanging instant messages or files?

ICQ and Skype are one of the most popular instant messengers. These programs keep all your contacts, so you have your friends and partners in one list. These communication tools allow you to have access to several user accounts and keep all your passwords. One instant messenger holds the passwords to your social networking profiles (Facebook etc.). With this handy approach you can save both your time and computer space.

Believe it or not, if you step away from your computer and leave it unsupervised you may suffer from an intruder overwhelmed with curiosity or driven by evil intent. The access to your chat history, passwords and exchanged files remains absolutely insecure. So, what can you do to protect all your passwords and chat history?


Encryption as a means of data protection is very popular with confidentiality connoisseurs. This involves different encryption algorithms recognized by the National Institute for Standards and Technologies (USA). Rohos Disk is a reliable assistant providing you with convenient, fast, and above all, safe encryption. The data are encrypted on-the-fly, and the encrypted disk is password protected. Lately, the developers have released a new version 2.0.

Read more about how to encrypt entire Skype profile folder with all of your messages and contacts.

What’s new in the Rohos Disk Encryption v 2.0?

  • The encryption of folders and profiles of ICQ, Skype, QIP applications as well as Google Chrome, Mozila Firefox and Opera browsers or the entire My documents folder.We are constantly introducing new methods of data protection for users. Now, the data protection is triggered for numerous folders indicated in the Rohos Disk list by default.

    Your chat history, contacts list and files exchanged should be protected and accessible only by you. Your web browsers’ passwords saved in Master Password and the history of your visits will be stored on the Rohos Disk and accessed only at your request.

  • Allow shared access to the encrypted Rohos disk
    One more secure and convenient feature is restriction of the access to the encrypted disk for users sharing the same computer. With this feature activated, the encrypted Rohos Disk becomes available for all of the local users (Windows Fast User switching) or network users. 

    By default Allow shared access option is disabled, it means that the drive letter will be seen only through your user account even if there are 2 users sharing the same computer.

    And it also means that you can easily encrypt your disk in all your user accounts and then connect or disconnect it keeping the rest of the users away from your disk stuff. While switching to another user account the virtual disk can be accessed only by the authorized user. Thus, the virtual disk can help you significantly increase the level of your data protection and security. The Rohos Disk can be disconnected through certain user account.

About compatibility with Windows 8:

Please note while using Rohos Disk in Windows 7/8, with  User Account Control option enabled it may happens that some Application running the highest level of privilege may not be able to access Rohos Disk. In this case you just need to open Rohos Disk Encryption main window.

Why Rohos Disk is the right choice?

  • The encrypted information is portable
  • Compatibility with Windows 8
  • Allows to encrypt any Application data folder
  • You can hide the encrypted disk container into a media file (AVI, mkv, wma video containers)
  • You can totally encrypt your favorite instant messenger keeping the contacts list, passwords and chat history confidential.
  • Encrypt and Lock Skype, Firefox, Opera and Chome application with its profile folder.
  • Freeware version offers 4GB encrypted drive for free Learn more¦

Download 2.0 version here – Rohos Disk (30 days demo) or use Rohos Mini Drive free of charge with 4GB encrypted data.

Allowing common access to an encrypted disk

$
0
0

Rohos Disk Encryption allows you to set up common access to an encrypted disk for various purposes:

  1.  Common access to all users of a single computer. For example, on a Windows terminal server, users in this case do not need to know the password for the disk, and they do not need to run the Rohos Disk program. They will not know where the file container of the disk is and cannot delete it. The password for accessing the disk is entered by the Administrator or the owner of the Rohos disk.
  2. Access for certain users on a single Windows computer. In this case each user knows the password for the disk. Each user enters the password for accessing the disk independently whenever necessary.
  3. Common access through a shared network folder. The Rohos disk drive letter will be open for common access on the local network from the computer which acts as the file server. Entering the password to enable the Rohos disk is done by the Administrator or owner of the Rohos disk once per day. He or she will also grant users privileges for network access and is also responsible for making backups and shutting down access to the disk.


Common access for all users of a single computer.

1stcase

In the Rohos Disk options you must enable Enable shared disk drive (local and network).

options
In this case, when one user connects a Rohos disk, the drive letter of this disk will be immediately visible to all users when they open Explorer.

When the read-only option is set, users (including the owner) cannot change the contents of the Rohos disk.

read-only

You can set up different rights for reading and writing to the folder within the disk itself. You give some users full control, while other users will have read-only access, and a third group will not be authorized to view the contents of the secret Rohos disk at all.

NTFS

Advantages of this method:

  1. Only one user, the owner of the disk, has the password.
  2. Ability to limit access to certain users.
  3. The disk can be located in a place where only its owner has access to it, which limits the possibility that it can be copied or deleted by others.
  4. Users do not need to know the password for the secret disk, and the drive letter will be immediately visible in Explorer.
  5. This setup is also suitable for users on a Terminal server. Work folders with especially important and confidential files and programs can be converted to a Rohos disk using the “Encrypt folder” function. This will make the disk protection transparent to users of the remote desktop.

Features of this method:

When opening Rohos Disk for other users, the drive letter will be visible among the computer’s additional disks. If it is suddenly turned off, it will become inaccessible for all users. To avoid this, you can deny users the right to launch Rohos Disk on the server by protecting it with a password.

Pass

In addition, you must untick the option Show Rohos Icon near the clock so that users cannot manage the disk by clicking on the icon near the clock.

Providing access to certain users working on a single Windows computer.

shared_container


To set up this form of common access:
1. You must turn the option Enable shared Disk drive off. In this case the drive letter will be visible only to a session or account where the password for activating this encrypted disk has been entered.

2. The file container should be placed in a common-access folder and different access rights should be granted for different users in order to prevent unauthorized copying or deletion of this file.
Some users will be able to open the folder for reading and writing, while other users will have read-only access. Other users still will not be able to view it at all.

shared

3. It is necessary to create a shortcut for activating this disk and copy it onto the desktop for certain users.
To do this, in the main window go to Rohos Disk Encryption > Disk > Tools > Create disk shortcut. Then a file with the given shortcut will be visible on the desktop.

4. You can give the password for the Rohos disk to all users or hand out access keys such SafeNet ikey, ruToken, eToken and other PKCS#11-compatible devices.

Advantages of this method:

  1. The owner of the disk does not have to activate the Rohos disk every time.
  2. There is no need to password-protect the Rohos Disk window.
  3. One user closing the disk does not disturb the work of other users.
  4. The drive letter will be isolated from other sessions. For example, this is convenient if the system has untrusted administrators, and in this case they cannot get access to the secret disk. In the case of using access key devices to access the disk, it is not possible to discover the Rohos disk password.


Common access through a shared network folder

The entire Rohos encrypted disk or some folders on it can be opened up for common access over the network. Select the disk in My Computer and enter its properties through the context menu.

Assigning access to this disk for different categories of network users can be done here with the Permissions command.

Connect the Rohos disk network folder to the workstations on the network:

Advantages of this way of assigning access:

  • The encrypted disk can be located on both on a computer or a connected USB storage device.
  • You set it up so that when a USB storage device is disconnected, the encrypted disk will be automatically disabled, the network folder will disappear, and it will no longer be possible to access it.
  • You can set up a hardware security module (HSM) for accessing the secret disk, e.g. USB tokens like ruToken, iKey, or eToken. You can entrust such a token for the disk to the employee responsible for activating the disk. When the token is disconnected from the PC, the disk will automatically turn off.
  • Activating a secret disk can only be done by means of a password or automatically by connecting a USB token.
  • Network users do not necessarily have to know the password for the disk to begin working with all, but all data will be reliably secured on the file server.

While one network user is working with one file or directory, another user can work with another file or directory. It will appear as a simple common-access resource. However, as soon as you leave the system, access to it will automatically end.

Using electronic access keys in Rohos Disk

$
0
0

Configuring a key device for an encrypted diskFor convenience and security, instead of a password to open an encrypted disk you can use electronic USB access keys. As a key you can use a USB flash disk, a token, or a smartcard. A full list of compatible devices can be found here.

The master user can set a key for a disk immediately after installing the program, or by using the command Setup a Key in the main program window (see picture).

The password for the disk will remain on the key in encrypted form. When using some tokens users must also set and remember a PIN. All devices, with the exception of USB flash disks, require you to first install the manufacturer’s drivers. Some tokens or smartcards must first be initialized with the manufacturer’s utility. At our blog you will find an overview of the most popular devices for protecting your information.

Of course, for an encrypted disk placed on a USB storage drive, you cannot use this same USB device as an access key.

Open the program options. Here it is possible to configure automatic activation of an encrypted disk when the key is connected, as well as automatic disabling of the disk when the key device is removed.

Tips for using an electronic key for securing information

Electronic keys have now proven to be useful and essential tools for many years. This is a durable and reliable means of securing information. Below we will give some tips that we think are especially important:

  • A spare copy of the key significantly eases access to your information in the event that your key is lost or damaged. If you have decided to use an electronic key, then buy two, configure them both, and keep the second key as a backup.
  • If you decide not to create a second key, then a good solution is to create a backup copy of the certificates and other important information on the key. This is also a good practice in general. Such backup copies should be kept in a secure place.
  • If you are the owner of a notebook computer, then use a micro-version of the key. They do not stick out much from the notebook and aren’t so prone to damage. See our overview of ruToken micro keys.
  • It is important to note that you don’t have to worry about leaving the token connected to the notebook or computer while you are away from it. Thanks to the use of a PIN, the electronic key itself is always kept safe from a third party. No one can use the key without the PIN, and entering a PIN incorrectly three times will block the key. Unblocking a key can be done with an Administrator’s PIN.
  • By default the Administrator PIN is set on all tokens and its default value is set out in the documentation. For that reason its value must be changed. You can only change an Administrator PIN using the utility for tokens, which is provided by the manufacturer. We again recommend that you keep your new Administrator PIN in a safe place.

In the Rohos Disk program there is a convenient function to block access to a Rohos disk when you are away. When you come back, the Rohos program will ask for the PIN for the token. You will have 25 seconds to answer before the disk is automatically disabled for security.

The screenshots:

Viewing all 45 articles
Browse latest View live